How to Write a Custom ODBC Driver

Connecting a standard reporting tool such as Excel, QlikView, or Tableau with a data source can be challenging because there are hundreds of new data sources being created that companies like Tableau or Microsoft just do not have the bandwidth to build separate connectors for.
What do you do if you want to connect from Excel, QlikSense, Tableau, etc. to your very special data source? You write a custom ODBC driver.
Why an ODBC driver?
The ODBC specification defines a rich interface that allows any ODBC-enabled application to connect to a data store. For example, when you look at just about every data source to which Tableau connects, you see most have an ODBC driver that Tableau calls into rather than a native API.

Expert tip: Building a Custom Driver – A Caveat Implementing an ODBC driver from scratch is a challenging undertaking and many initiatives stall out because the ODBC API is very large and complex.
Three Key Considerations
To implement a driver that supports the OBDC specification, developers must understand:
- All the complexities of error checking, session management and data conversion, then design their code accordingly – in a robust and efficient manner.
- How to optimize data retrieval to get maximum performance when connecting to large and complex data stores.
- Cross-platform C/C++ requirements for such a project. And let’s face it, most organizations don’t have this kind of expertise – it’s not easy to find.
There’s an Easier Way
There is a way around this complexity. The SimbaEngine SDK, developed by experts in the field, is a complete implementation of the ODBC specification. It exposes an easy-to-use SDK that allows a user to create a robust and efficient driver for a data store. For data stores that do not support SQL, the SimbaEngine SDK provides an SQL parser and an execution engine. Developers can use these features to translate SQL queries to a custom API or query language that the data store understands.
Get Started: Six Steps to Developing a Custom ODBC Driver Using the SimbaEngine SDK
The following demonstrates how to use the SimbaEngine SDK to create a custom ODBC driver. We’ll connect to the Atlassian Bamboo REST API, a Continuous Integration (CI) and Continuous Deployment (CD) software application that automates software builds and release management. We’ll demonstrate how to accomplish the following development tasks to build the custom driver:
- Set up the development environment and build the sample driver.
- Use the sample driver as a template to create a custom ODBC driver.
- Make a connection to the data store.
- Retrieve metadata.
- Enable data retrieval.
- Rename and rebrand the custom ODBC driver.
This is the first installment in a two-part series of companion articles. We will cover steps 1-3 in this installment and steps 4-6 in a second installment.
We will use Visual Studio and the Microsoft Data Access (MDAC) 2.8 Software Development Kit (SDK), in addition to the SimbaEngine SDK for the build.
NOTE: It can be helpful to have some familiarity with C++ and exposure to SQL to follow along with the details of this custom driver build, though it’s not required.
Developer Tip: How to build custom drivers in 5 days or less! These guides walk you through how to modify a QuickStart sample diver written in Java, C#, or C++ to develop your custom driver. See: SimbaEngine SDK 5 days guides
Step 1. Set up the development environment and build the sample driver
The SimbaEngine SDK includes a sample driver that we will use as a template to create a custom ODBC driver for the data store that is not SQL-capable. The QuickStart driver is a sample DSI implementation of an ODBC driver—written in C++ for our example, but as noted above, also available in Java and C#—that reads files in tabbed Unicode text format. The Simba SQL Engine is used to perform SQL processing, allowing the QuickStart driver to retrieve data from the sample text files, which are not a SQL-capable data source. Using the QuickStart sample driver to prototype a DSI implementation for a custom data store is helpful in understanding how the SimbaEngine SDK works. By removing the shortcuts and simplifications implemented in the QuickStart driver, it can be used as the foundation for a commercial DSI implementation and to create a custom ODBC driver for a data store that is not SQL-capable. We’ll use the following document conventions to improve readability:
- Italics are used when referring to book and document titles.
- Bold is used in procedures for graphical user interface elements that a user clicks and text that a user types.
- Century Gothic font indicates commands, source code or contents of text files.
- NOTE: Indicates a short note appended to a paragraph.
- IMPORTANT: Indicates an important comment related to the preceding paragraph.
- Related links provide additional information
Install the SimbaEngine SDK
The first step for setting up the development environment is the installation of the SimbaEngine SDK. Instructions for doing that can be found here.
Build the Sample OBDC Driver
To build the QuickStart sample driver, we’ll use the following:
- In Microsoft Visual Studio, click File > Open > Project/Solution.
- In the Open Project dialog, navigate to the following folder:
[INSTALL_DIR]\SimbaEngineSDK\10.1\Examples\Source\QuickStart\Source
For our example, we’ll be using Simba for the installation directory.
- Select the file QuickStartDSII_VS2017.sln, then click Open.
- Click Build > Configuration Manager.
- Click the drop-down arrow next to the Active Solution Configuration field, then select Debug_MTDLL, and click Close.
- Click the drop-down arrow next to the Active Solution Platform field:
- To build a 32-bit driver, select Win32.
- To build a 64-bit driver, select x64. NOTE: 64-bit machines can build both 32- and 64-bit binaries. Most machines these days are 64-bit. We will assume a 64-bit driver on a 64-bit machine for this example going forward. Instructions for 32-bit drivers on 32-bit and 64-bit machines are available in our 5-day guides.
- Click Close.
- Click Build > Build Solution.
The build appears in the following folder:
[INSTALL_DIR]\SimbaEngineSDK\10.1\Examples\Source\QuickStart\Bin\<BUILD>\<RELEASE|DEBUG><CONFIGURATION>,
where
<BUILD> is a combination of the operating system, machine bitness, and compiler.
<RELEASE|DEBUG> is release or debug
<CONFIGURATION> is mt if MTDLL is selected as the solution configuration, otherwise md
For our example:
C:\Simba\SimbaEngineSDK\10.1\Examples\Source\Quickstart\Bin\Windows_VS2017\debug64md\QuickstartDSIIODBC64.dll
Related Links: Server Configuration
Examine the Windows Registry
Next, we will validate that the SimbaEngine SDK installer automatically added or updated the following registry keys that define Data Source Names (DSNs) and driver locations:
- ODBC Data Sources – lists each DSN/driver pair
- QuickStartDSII – defines the Data Source Name (DSN). The ODBC Driver Manager uses this key to connect the driver to the database.
- ODBC Drivers – lists the drivers that are installed
- QuickStartDSIIDriver – defines the driver and its setup location. The ODBC Driver Manager uses this key to connect to and configure the driver
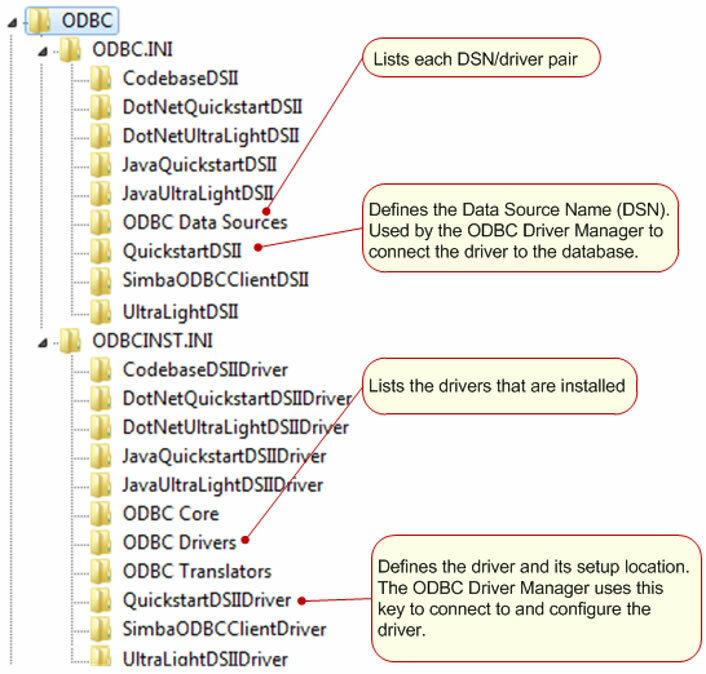
NOTE: The installer for the custom driver will create similar registry keys.
NOTE: For 32-bit software on 64-bit machines there are different registry sections. See the related links section for more details.
We’ll follow the steps below to view the registry keys for the QuickStart driver:
- From a command line, run regedit.exe.
- In the registry editor, navigate to the following root directory: HKEY_LOCAL_MACHINE\SOFTWARE\ODBC
- View the registry keys as explained in the rest of this section.
ODBC\ODBC.INI\QuickStartDSII key
This key defines the Data Source Name (DSN) for the QuickStart driver. It is located in the Windows Registry at:
HKEY_LOCAL_MACHINE\SOFTWARE\ODBC\ODBC.INI\QuickStartDSII
This key has the following values:
| SUBKEY | VALUE | DESCRIPTION |
| Driver | QuickStartDSIIDriver | The name of the driver to use for connecting to the data store, as defined in the ODBCINST.INI key. |
| DBF | [INSTALL_DIR\Examples\Databases\QuickStart\ Where [INSTALL_DIR] is the SimbaEngine SDK installation directory. |
The path to the data store used by the QuickStart driver. |
| Description | Sample 64-bit SimbaEngine QuickStartDSII | A description of the DSN. |
NOTE: Only the Driver subkey is required for the custom driver: other subkeys may be added later, based on what is required to complete a connection for your data source.
ODBC\ODBCINST.INI\ODBC Drivers key
This key contains one entry for every driver. The entry for the QuickStart driver is: QuickStartDSIIDriver = Installed
ODBC\ODBCINST.INI\QuickStartDSIIDriver key
This key defines the QuickStart driver. It is located in the Windows Registry at:
HKEY_LOCAL_MACHINE\SOFTWARE\ODBC\ODBCINST.INI\QuickStartDSIIDriver
This key has the following values:
<class= “table”>
SUBKEYVALUEDESCRIPTIONDriverC:\Simba\SimbaEngineSDK\10.1\Examples\Source\Quickstart\Bin\Windows_VS2017\debug64md\QuickstartDSIIODBC64.dllThe location of the driver DLL.
NOTE: This is the same as above from “Build the Sample ODBC Driver”SetupSame as above
NOTE: For Simba, the Setup DLL is the same as the Driver DLL.Same as aboveDescriptionSample [32|64]-bit SimbaEngine QuickStartDSIIA description of the driver
Related Links: Bitness and the Windows Registry
View the Data Source Name (DSN)
The Windows ODBC Data Source Administrator can be used to view the DSNs for the QuickStart driver. To do so, we’ll follow the steps below.
- Open the correct version of the Windows ODBC Data Source Administrator. For our 64-bit driver on 64-bit Windows, we’ll use the default application. Click Control Panel > Administrative Tools > Data Sources (ODBC).
- In the ODBC Data Source Administrator, click the System DSN tab
- Scroll through the list of System Data Sources, select the DSN (for example QuickStartDSII), then click Configure. The Data Source Configuration window opens, displaying the data source name, description and the data directory.
- When finished looking at the configuration values, click Cancel to close the Data Source Configuration window.
Related Links: Bitness and the Windows Registry
Connect to the Data Store
To connect to the data store and test the QuickStart driver, any ODBC application can be used. This section shows how we’ll use the is a simple tool which gives you full control over what ODBC API calls are made. It is included in the Microsoft Data Access (MDAC) 2.8 Software Development Kit (SDK).
To connect to the data store using the QuickStart driver, we will:
- Navigate to the folder containing the ODBC Test application, by default: C:\Program Files (x86)\Microsoft Data Access SDK 2.8\Tools
- Navigate to the folder that corresponds to the driver’s architecture: amd64 in our case.
- Click one:
- exe to launch the ANSI version
- Or, exe to launch the Unicode version. IMPORTANT: It is critical to run the correct version of the ODBC Test tool for ANSI or Unicode and 32-bit or 64-bit.
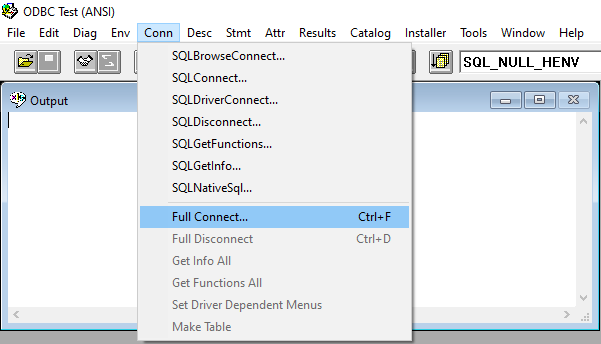
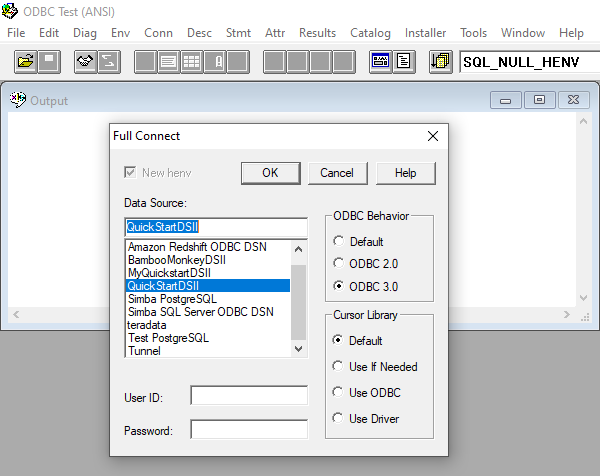
- In the ODBC Test tool, click Conn > Full Connect. The Full Connect window opens.

- In the Full Connect dialog, select QuickStartDSII from the list of data sources, and then click OK.

- In the ODBC Test window, enter
SELECT * from EMP
.
- Click
 and
and to output a simple result set. The results are displayed in the window.
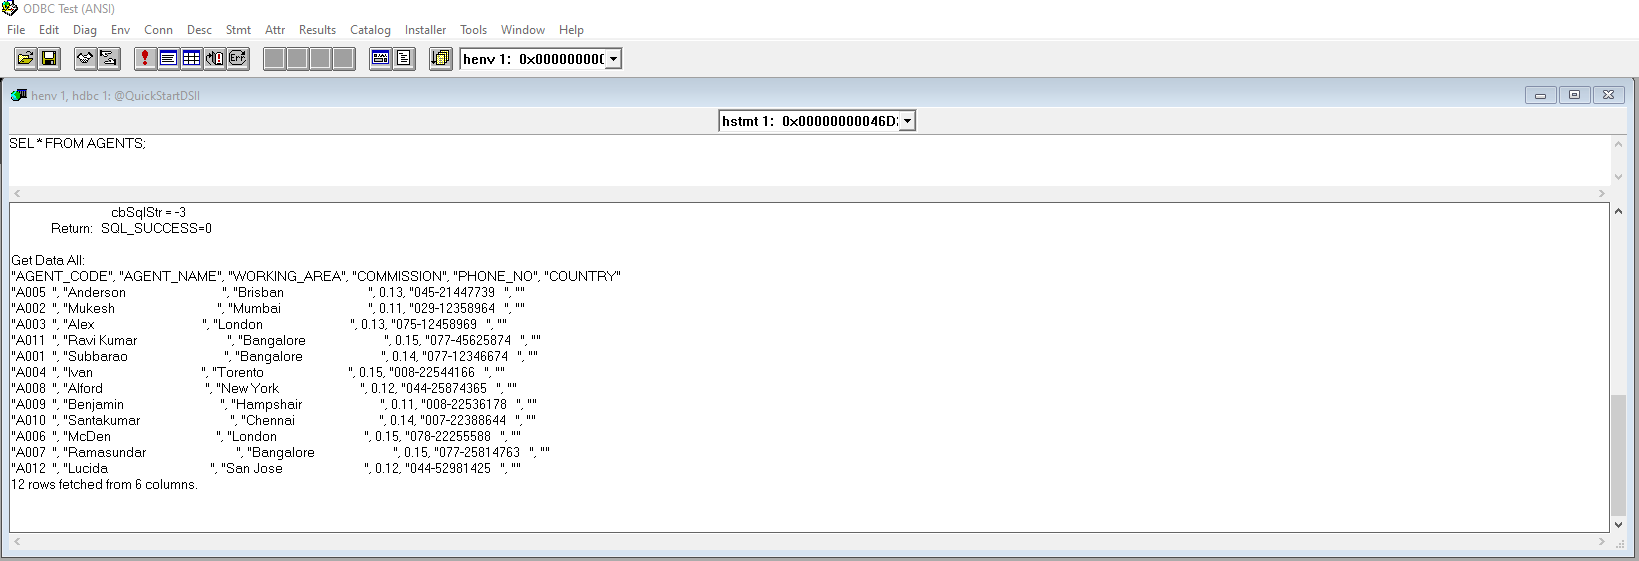
We have successfully built and used the QuickStart driver to connect to the sample data store and retrieve data. This verifies that the installation and development environment are properly configured.
Related Links: Bitness and the Windows Registry | Testing Your SimbaEngine SDK ODBC Driver with ODBC Test
Step 2. Use the sample driver as a template to create a custom ODBC driver
With your QuickStart sample driver built and tested, we will create, build, and test a custom driver by copying the QuickStart driver.
Set Up a Custom ODBC Driver Project
We will create a new project directory, because if we simply modify the sample project files, we can experience the following issues:
- All the changes will be lost when a new version of the SDK is installed.
- We will lose our frame of reference for debugging.
- There may be times, for debugging purposes, that we will need to see if the same error occurs using the sample drivers. If we have modified the sample drivers, this won’t be possible.
To set up our custom project, we will execute the following sequence of steps:
- In Windows Explorer, copy the following directory and paste it to the same location:
C:\Simba\SimbaEngineSDK\10.1\Examples\Source\QuickStart
where C:\Simba is the SimbaEngine SDK installation directory. This will create a new directory called QuickStart – Copy.
- Rename the directory to Bamboo.
- Rename the file Bamboo > Source > QuickStartDSII_VS2017.vcxproj. This is the project file for the custom ODBC driver.
- Rename the .sln This is the solution file for the custom ODBC driver.
- Using a text editor, open the project file .vcxproj and replace every instance of QuickStartDSII in the source code with Bamboo.
- Save and close the file .vcxproj.
- Using a text editor, open the solution file .sln and replace every instance of QuickStartDSII in the source code with Bamboo.
- Change any references to the project file to Bamboo.vcxproj.
- Save and close the file.
To build the custom ODBC driver, we will:
- Launch Microsoft Visual Studio 2013.
- Click File> Open>Project/Solution.
- Navigate to C:\Simba\SimbaEngineSDK\10.1\Examples\Source\Bamboo\Source and open the Bamboo.sln file, where Bamboo is the renamed project.
- Click Build > Configuration Manager; make sure that the active solution configuration is Debug_MTDLL and the active solution platform is x64, then click Close.
- Click Build > Build Solution to build the driver. This builds the Debug_MTDLL version of the custom ODBC driver and places the DLL in the following location:
C:\Simba\SimbaEngineSDK\10.1\Examples\Source\Bamboo\Bin\Windows_vs2017\debug64md
- Make sure the Output window is displayed. Select Debug > Windows > Output.
When the project for the custom ODBC driver is successfully built, the following “TODO” messages appear in the Output window along with the build information:
TODO #1: Construct driver singleton.
TODO #2: Set the driver properties.
TODO #3: Set the driver-wide logging details.
TODO #4: Set the connection-wide logging details.
TODO #5: Check Connection Settings.
TODO #6: Establish A Connection.
TODO #7: Create and return your Metadata Sources.
TODO #8: Open A Table.
TODO #9: Register Messages xml file for handling by DSIMessageSource.
TODO #10: Set the vendor name, which will be prepended to error messages.
We will modify the source code for each of the TODO messages in the sections that follow.
Update the Windows Registry
The Data Source Name (DSN) and driver settings for the custom ODBC driver are configured in the Windows Registry. The custom driver configuration is similar to the QuickStart driver configuration, described in Examine the Windows Registry.
The SimbaEngine SDK includes .reg files that can be used to modify the custom ODBC driver and create the driver’s registry keys.
We will execute the following steps to update the Windows Registry:
- In Microsoft Visual Studio or another text editor, navigate to the following directory: C:\Simba\SimbaEngineSDK\10.1\Examples\Source\Bamboo\Source
- Open the following file for the 64-bit ODBC driver on 64-bit Windows: SetupMyQuickStartDSII-64on64.reg.
- In the file, replace [INSTALL_DIRECTORY] with the SimbaEngine SDK installation directory. Use double backslashes in the path. Our example: With the SimbaEngine SDK installation directory C:\Simba, replace all instances of [INSTALL_DIRECTORY] with C:\\Simba.
- Change all instances of MyQuickStart to Bamboo, the name of our custom ODBC driver. The following changes will be made:
- Under [HKEY_LOCAL_MACHINE\SOFTWARE\ODBC\ODBC.INI\ODBC Data Sources], the key ”
"BambooDSII"="BambooDSIIDriver"
-
"Driver"=”BambooDSIIDriver"
- [HKEY_LOCAL_MACHINE\SOFTWARE\ODBC\ODBC.INI\BambooDSII]
- Under [HKEY_LOCAL_MACHINE\SOFTWARE\ODBC\ODBCINST.INI\ODBC Drivers], the key
"BambooDSIIDriver"="Installed"
- [HKEY_LOCAL_MACHINE\SOFTWARE\ODBC\ODBCINST.INI\BambooDSIIDriver]
- Under [HKEY_LOCAL_MACHINE\SOFTWARE\ODBC\ODBC.INI\ODBC Data Sources], the key ”
- Update “Setup” with the path to the custom driver DLL.
- Update “Driver” with the path to the custom driver DLL.
- Replace every other instance of QuickStart in the file with Bamboo, except for the DBF=path. This is the path to the sample database included with the SimbaEngine SDK:
"DBF"="C:\\Simba\\SimbaEngineSDK\\10.0\\Examples\\Databases\\Quickstart"
- Click Save and close the file.
NOTE: Some of the registry settings in this .reg file are used for Client – Server configuration. These can be removed when not developing a driver for Client – Server deployment,
To import the configuration settings into the Windows Registry:
- Open regedit.exe, click File > Import, navigate to the registry file that we modified, and then click Open. A message indicating that the keys and values have been successfully added to the registry is displayed.
- To verify the Data Source Name for the new project, see View the Data Source Name (DSN).
We will now use this project as a framework to create the custom ODBC driver.
Related Links: Bitness and the Windows Registry | Examine the Windows Registry
Debug the Custom ODBC Driver
We can use the Visual Studio debugger to step through our custom ODBC driver code in order to gain a better understanding of its functionality. This section explains how we can use the application to connect to the custom ODBC driver, then use Visual Studio debugger to step through the driver code.
To open the ODBC Test application:
- Navigate to the folder containing the ODBC Test application, by default: C:\Program Files (x86)\Microsoft Data Access SDK 2.8\Tools
- Navigate to the folder that corresponds to our machine’s architecture: amd64.
- Click one:
- odbcte32.exe to launch the ANSI version
- Or, odbct32w.exe to launch the Unicode version.
IMPORTANT: It is important to run the correct version of the ODBC Test tool for ANSI or Unicode and 32-bit or 64-bit.
To attach the Visual Studio debugger to the ODBC Test process, we’ll complete the following steps:
- In Microsoft Visual Studio, click Debug>Attach to Process.
- In the Attach to Process window, select the ODBC test process launched in the previous step, and then click Attach. The process name will be either exe or odbct32w.exe.
- Add a breakpoint in cpp, on the function DSIDriverFactory(). This function runs as soon as the Driver Manager loads the ODBC driver.
- In the ODBC Test tool, select Conn> Full Connect. The Full Connect window opens.
- Select the data source from the list of data sources and then click OK.
- The Visual Studio debugger hits the breakpoint created at DSIDriverFactory().
- To continue running the program, select Debug>Continue. The focus returns to the ODBC Test
- In the ODBC Test window, enter SELECT * from EMP.
- Clickandto output a simple result set.
This step verifies that our custom ODBC driver, based on the QuickStart project, is correctly installed and configured, and that the development system is properly set up.
Related Links: ODBC Troubleshooting: How to Enable Driver-manager Tracing | Testing ODBC Drivers on Windows in Developing Drivers for Data Stores Without SQL
Enable Logging
To gain a better understanding of how the custom OBDC driver works, logging can be turned on. Instructions to enable logging can be found here.
After enabling logging, close then re-open ODBC Test. The application needs to re-load the driver for the logs to be generated. You can then perform a query and find the corresponding details in the log files.
Step 3. Make a connection to the data store
Next, we will authenticate the user against the Bamboo data store and establish a connection with Bamboo.
Finding the TODO messages
As noted in the previous section, when the custom project is built, TODO messages display in the Output window.
To rebuild the whole solution, we’ll select Build > Rebuild Solution. (If the Output window is not open, select Debug > Windows > Output.)
Double click a TODO message to jump to the relevant section of code.
Set the Configuration Branding
The DSIDriverFactory() implementation in Main_Windows.cpp is the main entry point that is called from Simba’s ODBC layer to create an instance of the DSI implementation. This method is called as soon as the Driver Manager calls LoadLibrary() on the ODBC driver DLL.
We will construct the driver singleton as follows:
- In the custom ODBC driver project, we double-click the TODO #1 Construct driver singleton message to jump to the relevant section of code. The Main_Windows.cpp file opens.
- Look at the DSIDriverFactory() implementation to rebrand the driver name and the company name. This change affects the location in the Windows Registry where the driver values are looked up:
- Find the line
SimbaSettingReader::SetConfigurationBranding(DRIVER_WINDOWS_BRANDING);
- Right click DRIVER_WINDOWS_BRANDING and select Go to Definition. The file QuickStart.h opens. NOTE: The file name might have a different case, for example QuickStart.h or Quickstart.h.
- In the line #define DRIVER_WINDOWS_BRANDING “Simba\\QuickStart”, we’ll keep Simba as our company name and change QuickStart to Bamboo.
- Find the line
EXAMPLE:
If DRIVER_WINDOWS_BRANDING is set to “Simba\\QuickStart”, then the base path for values in the Windows Registry is HKLM\SOFTWARE\Simba\QuickStart
If the DSII is compiled as a driver, it will use \Driver as a suffix. If the DSII is compiled as a server, it will use \Server as a suffix. Therefore, a 64-bit driver would use the full path of HKLM\SOFTWARE\Simba\QuickStart\Driver to look up the registry keys such as ErrorMessagesPath.
- Click Save.
Set the Driver Properties
To set the driver properties, we will:
- Double click the TODO #2 Set the driver properties message to jump to the relevant section of code. The cpp file opens.
- Go to the method SetDriverPropertyValues(), where the general properties for the driver are set. Change the properties described below:
| PROPERTY | DESCRIPTION |
|---|---|
| DSI_DRIVER_DRIVER_NAME | Set this property to the name of the driver (the same name used to replace QuickStartDSII). This is the driver name that is shown to the application. |
Set Logging Details
In this section, we’ll set the driver-wide and connection-wide logging.
To set logging details, we’ll execute the following instructions:
- Double click the TODO #3 Set the driver-wide logging details message to jump to the relevant section of code.
- Change the quickstart_driver.log file name.

- Double click the TODO #4 Set the connection-wide logging details message to jump to the relevant section of code.
- Change the connection log’s file name. Under default behavior this is routed to the driver logs. If you want to log connections differently you need to override the QSConnection::GetLog() fuction

- Click Save All.


NOTE: By default, the QuickStart driver maintains two kinds of log files: one for all driver-based calls and one for each connection created. These sections can be updated if fine granularity in logging is not required.
Instructions to enable logging can be found here.
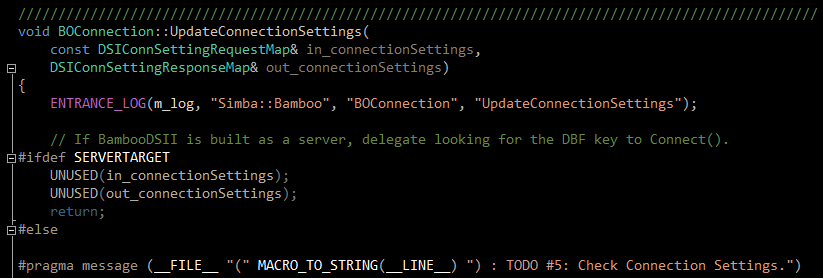
Check Connection Settings
When the Simba ODBC layer is given a connection string from an ODBC-enabled application, the Simba ODBC layer parses the connection string into key-value pairs. The entries in the connection string and the DSN are then sent to the QSConnection::UpdateConnectionSettings() function for validation.
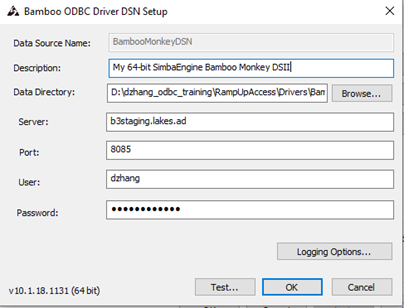
EXAMPLE: The following is an example of a connection string that specifies what Data Source we’re trying to connect to and what credentials we want to connect with.
<ConnectionString>DSN=TestDSN;
DBCNAme=192.168.1.1;
UID=username;
PWD=password;
CharacterSet=UTF8;
DefaultDatabase=testDatabase</ConnectionString>
If entries of the connection string overlap entries from the DSN, then the connection string will override parameters from the DSN. To pass additional parameters to the DSII, new parameters and new entries can be added to the connection string and DSN entry respectively. These values will automatically be picked up by the SDK and passed through for use by the DSII.
UpdateConnectionSettings() receives all the incoming connection settings that are specified in the DSN that was used to establish the connection. The role of this function is to ensure that all required, and any optional, settings are present. Note that actual data validation of the settings should be done in the Connect() function.
EXAMPLE:
The connection string “DSN=QuickStart;UID=user;” will be broken down into key value pairs and passed in via the DSIConnSettingRequestMap parameter. In this case that map would contain two entries: {DSN, QuickStart} and {UID, user}. If a DSN was specified, then the DSN value is removed from the map and any entries that are stored in the preconfigured DSN are inserted into the map. Once the map has been created with all the key-value pairs from the connection string and DSN, this map is passed down to the DSII.
To check the connection settings for the custom driver, we’ll do the following:
- Double click the TODO #5 Check Connection Settings message to jump to the relevant section of code.
- Modify the UpdateConnectionSettings() function to validate that the settings (key-value pairs) in the DSIConnSettingRequestMap are sufficient to create a connection. Any settings not present should be added to the DSIConnSettingResponseMap parameter.We recommend using the VerifyRequiredSetting() or VerifyOptionalSetting() functions to perform this verification. These functions also add missing settings to DSIConnSettingResponseMap.EXAMPLE: The VerifyRequiredSetting() method is contained by the UpdateConnectionSettings().
 NOTE: The connection settings listed in UpdateConnectionSettings() are specific to the QuickStart driver. A custom driver will require different settings. The QuickStart driver requires a single key in the DSN, DBF. The other keys are optional. EXAMPLE: The Bamboo driver verifies that the settings contained in in_connectionSettings are sufficient to create a connection by using the following VerifiedRequiredSetting and VerifyOptionalSetting helper functions
- If any required values are missing, the driver will either fail to connect, or will call PromptDialog(), depending on the connection settings. If all required values exist, then Connect() will be called.
- If any of the values received are invalid, then the code should throw an ErrorException seeded with DIAG_INVALID_AUTH_SPEC.
 NOTE: The connection settings listed in UpdateConnectionSettings() are specific to the QuickStart driver. A custom driver will require different settings. The QuickStart driver requires a single key in the DSN, DBF. The other keys are optional. EXAMPLE: The Bamboo driver verifies that the settings contained in in_connectionSettings are sufficient to create a connection by using the following VerifiedRequiredSetting and VerifyOptionalSetting helper functions
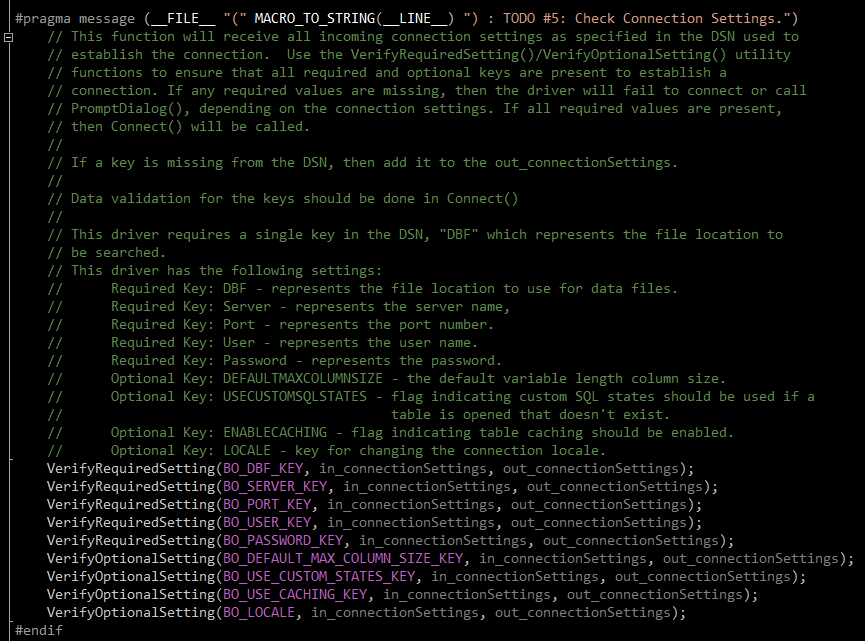
Manually Verifying the Connection Settings
Settings can also be verified manually. If the entries within in_connectionSettings are not sufficient to create a connection, then the driver can ask for additional information from the ODBC-enabled application by manually specifying the additional, required settings in out_connectionSettings. If there are no further entries required, simply leave out_connectionSettings empty.
For more information on ODBC connections, see the Knowledge Base article DSII Connection Process for ODBC
Establish a Connection
The SimbaEngine SDK calls UpdateConnectionSettings() before calling QSConnection::Connect(). Once QSConnection::UpdateConnectionSettings() returns out_connectionSettings without any required settings—if there are only optional settings, a connection can still occur—then the Simba ODBC layer calls QSConnection::Connect(), passing in all the connection settings received from the application.
During Connect(), the driver should have all the settings necessary to make a connection as verified by UpdateConnectionSettings(). We can use the utility functions GetRequiredSetting() and GetOptionalSetting() to request the required and optional settings for our connection, and attempt to make an actual connection.
To establish a connection, we will:
- Double click the TODO #6 Establish A Connection message to jump to the relevant section of code.
- For Bamboo, we need to add code that authenticates the user against the Bamboo server using the information provided within the in_connectionSettings parameter. Use GetRequiredSetting() and GetOptionalSetting() to access the settings in the map.

- Add validation to our custom ODBC driver. If authentication fails, throw an ErrorException seeded with DIAG_INVALID_AUTH_SPEC. Note that the sample ODBC driver does not perform validation.
We have successfully authenticated the user against our data store and have established a connection.
Congratulations! You are now ready to move onto: How to build a custom ODBC Driver Part two.

Interested? If so, we welcome you to take advantage of our free, 20-day evaluation. It comes complete with the SimbaEngine SDK Evaluation Software and a dedicated support team to assist you throughout the evaluation.Start your evaluation